Description
FEATURES:
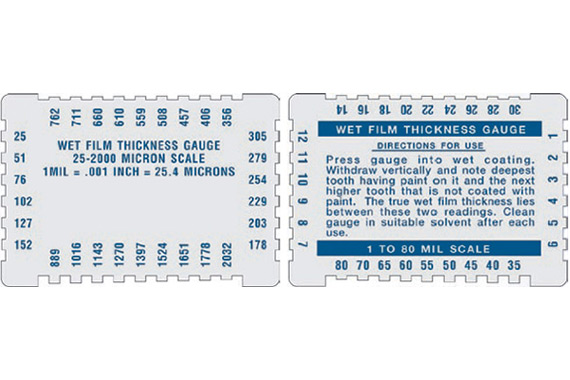
- Meets ASTM D 4414 “Standard Practice for Measurement of Wet Film Thickness of Organic Coatings by Notched Gauges” Standard used is traceable to NIST- All Aluminum – Size: 2-1/4 ” x 3-1/4″ x .034″
- All aluminum construction
- Double sided, dual scale
- Gauge Range in Microns: 25, 51, 76,102,127,152,178, 203, 229, 254, 279, 305, 356, 406, 457, 508, 559, 610, 660, 711,762, 889, 1016, 1143, 1270, 1397, 1524, 1651, 1778, 2032
- Gauge Range in Mils: 1, 2, 3, 4, 5, 6, 7, 8, 9,10,11,12,14,16, 18, 20, 22, 24, 26, 28, 30, 35, 40, 45, 50, 55, 60, 65, 70, 80
- Press gauge into wet film at 90° angle and then withdraw; note the deepest tooth having paint on it and the next higher tooth that is not coated; true wet film thickness lies between these two readings
How to Use
- Place gauge on wet film at 90° angle
- Press into film
- Withdraw and note deepest tooth having paint on it and next higher tooth that is not coated
- The wet film thickness lies between these two readings
- Clean gauge in any suitable solvent immediately after use

Wet Film Indicator
The drawing indicates that tooth marked 3 mils is covered with the wet paint and tooth marked 4 mils is not covered. This indicates that the true wet film thickness of the material is between 3 and 4 mils thick.


